Jump to content


Photo

CourseForge the Classic Renditions Way!!


18 replies to this topic

#1 slewin

slewin

    Advanced Member

  • Members
  • PipPipPip
  • 400 posts

Posted 05 September 2018 - 08:38 AM

Hello Happy CourseForgers,

I am about 2 years overdue with these videos so apologies.
These 2 videos hopefully explain the overlay technique that we always use starting with downloading the aerial image and working in photoshop and using the overlay image in Unity and courseforge. The link below also contains the textures we used and the overhead image so you guys can experiment a little.

Please let me know if there are any issues with the files and apologies about the crappy audio.

https://1drv.ms/f/s!...ml-_5RCmSeE5rzw

Anyway have fun and I hope you get something out of it.

All the best
Classic Renditions


  • tsmith, Kablammo11, Skunky and 4 others like this

#2 tsmith

tsmith

    Advanced Member

  • Members
  • PipPipPip
  • 44 posts
  • LocationTennessee

Posted 05 September 2018 - 11:17 AM

This is awesome

 This is the kind of sharing that builds a community, Thank you

 K11 shared some trees yesterday and asked others to share what they could. This Kind of stuff builds a community up.

Thanks again !!


#3 DoGgs

DoGgs

    Advanced Member

  • Members
  • PipPipPip
  • 2,688 posts
  • Locationcaerphilly

Posted 05 September 2018 - 11:43 AM

Makes me wanna start another course, had a quick peek at the vid, fantastic and thanks very much.  It's incredible how better it looks as opposed to the basic stock textures, great share.


Qaaa8vE.jpg


#4 jt83

jt83

    Advanced Member

  • Members
  • PipPipPip
  • 1,020 posts

Posted 05 September 2018 - 12:40 PM

Makes me want to give up!  Too many wizards.


#5 RobC

RobC

    Advanced Member

  • Members
  • PipPipPip
  • 782 posts
  • LocationSouthampton England

Posted 05 September 2018 - 05:11 PM

I think its an awesome feature of Course Forge I used it for all the Bandon Courses and St Andrews but as you say it is heavily dependant on the overhead image....Its a lot easier with Links courses cause there are less trees  :D

Cheers RobC


  • NoPutt likes this

#6 Kablammo11

Kablammo11

    Obscure Person

  • Members
  • PipPipPip
  • 3,953 posts

Posted 05 September 2018 - 05:40 PM

I think the overhead image is not quite so important - it can be composed. This would be a very interesting feature for fictional courses as well. We could use it to draw mow lines that actually espouse the curves of a golf hole, surround a green or create a first-cut looking (not playing) shield in front of the greens. Also we could, for example, make the bottoms of bunkers lighter or darker. And of course grunge up the fairways, add dirt and dry patches.

Such a fake overhead image, I would estimate, can be constructed from a 2D top-down view of the CF splines (to get the exact outlines in relation to the terrain) and would require 2 to 4 hours of Photoshop to select the colours and copy-paste into this fitting bits from other golf courses captured from google maps satellite images. I would also try and export this image as a Compuserve GIF file, seeing as that should be less in size than a PNG, TIFF or Photoshop image.


I always wanted to try this out, but have held back so far because I wanted to see how the PG2 volumetric grass would interact with this feature (probably no problem in the overview window, but at ground level? Not sure...) Might also be that the current Unity versions, as opposed to our outdated 5.2.3, might support even larger textures, and that would considerably help to lessen the crude pixelation when seen from close-by.


  • RobC and NoPutt like this

>>>>>>> Ka-Boom!


• Mulligan Municipal • Willow Heath • Pommeroy • Karen • Five Sisters • Xaxnax Borealis • Aroha • Prison Puttˆ

• The Upchuck   The Shogun  • Black Swan (•)


<<<<<


#7 NoPutt

NoPutt

    Advanced Member

  • Members
  • PipPipPip
  • 2,902 posts
  • LocationSouth Carolina

Posted 05 September 2018 - 07:50 PM

I agree it's an awesome feature, and even the pixelated

overheads can be optimized in PS with some tender care and time.

The Bing images seem to match better than Google to me, but either

way I find it quite fun to see-saw back and forth from PS to Unity

and watch the changes.


Dry Gulch...................Released                     Smithfield Golf Club...........Released

Millstone Golf Club....Released                      The Walker Course............Released

Kingsmill Woods Course...Released               Pine Lake Golf Club..........Released

Woodhaven Golf Club (9) Released                The Reserve at Keowee...Released

Cliffs at Keowee Vineyards..Released              The Ace Club...................Released

Dry Gulch 2..........Released                               Blackberry Oaks.............Released


#8 chrismess13

chrismess13

    Advanced Member

  • Members
  • PipPipPip
  • 75 posts
  • LocationButte County, CA

Posted 20 September 2018 - 06:44 PM

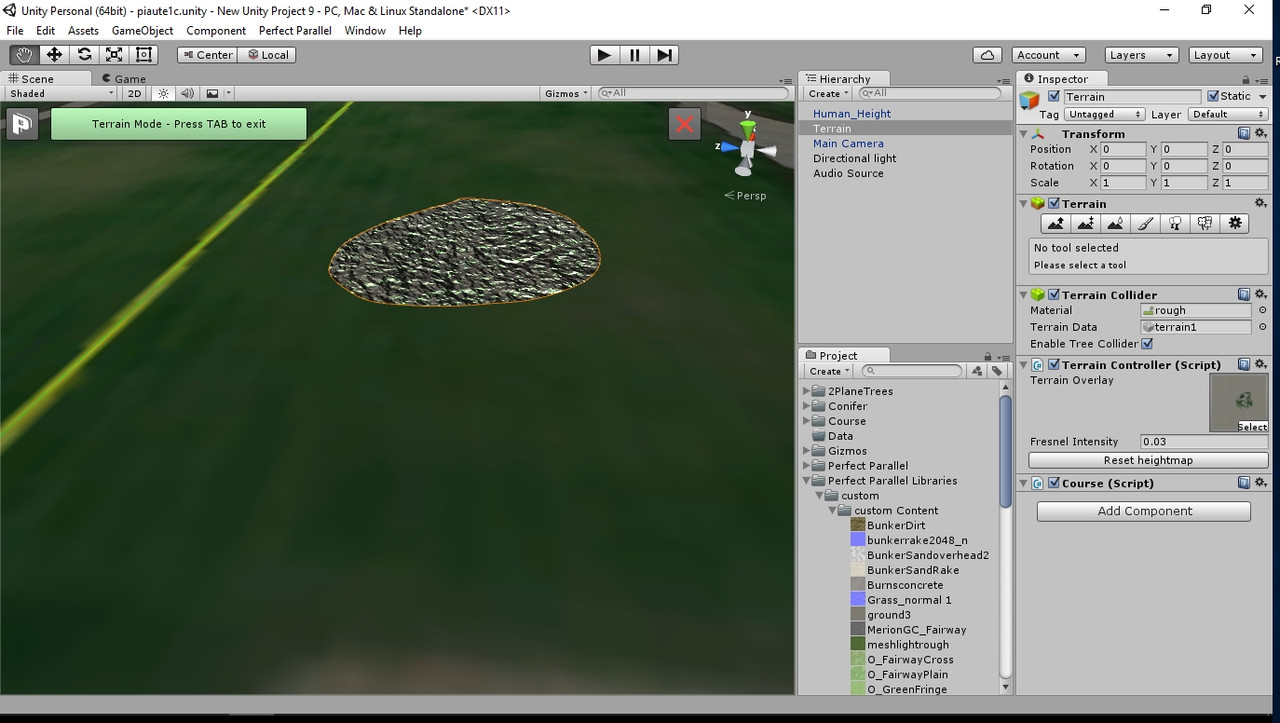
When I try this technique instead of seeing the overlay through the spline I see the normal maps. I checked to make sure the normals were not set as textures. Any help would be appreciated. I have played around with different settings but I don't want to get to deep and trap myself in a corner I can't get out of. Tried to post a screenshot and its just the link instead if you click you will see the screenshot.

<a href="https://ibb.co/cEFH2...eight</a><br />


#9 NoPutt

NoPutt

    Advanced Member

  • Members
  • PipPipPip
  • 2,902 posts
  • LocationSouth Carolina

Posted 20 September 2018 - 07:06 PM

The terrain overlay is not in the Terrain Controller (script) for one thing.


Dry Gulch...................Released                     Smithfield Golf Club...........Released

Millstone Golf Club....Released                      The Walker Course............Released

Kingsmill Woods Course...Released               Pine Lake Golf Club..........Released

Woodhaven Golf Club (9) Released                The Reserve at Keowee...Released

Cliffs at Keowee Vineyards..Released              The Ace Club...................Released

Dry Gulch 2..........Released                               Blackberry Oaks.............Released


#10 chrismess13

chrismess13

    Advanced Member

  • Members
  • PipPipPip
  • 75 posts
  • LocationButte County, CA

Posted 20 September 2018 - 07:31 PM

It was in the script before I started trying different things and the result was the same.

picture065.jpg


picture064.jpg


#11 NoPutt

NoPutt

    Advanced Member

  • Members
  • PipPipPip
  • 2,902 posts
  • LocationSouth Carolina

Posted 20 September 2018 - 08:50 PM

Your Terrain Image needs to go into these places.

The image in your projects is opened and altered

in Photoshop and then saved back into Unity.

yhbn8Lx.jpg


Dry Gulch...................Released                     Smithfield Golf Club...........Released

Millstone Golf Club....Released                      The Walker Course............Released

Kingsmill Woods Course...Released               Pine Lake Golf Club..........Released

Woodhaven Golf Club (9) Released                The Reserve at Keowee...Released

Cliffs at Keowee Vineyards..Released              The Ace Club...................Released

Dry Gulch 2..........Released                               Blackberry Oaks.............Released


#12 chrismess13

chrismess13

    Advanced Member

  • Members
  • PipPipPip
  • 75 posts
  • LocationButte County, CA

Posted 21 September 2018 - 02:00 AM

Thank you for the replys. Sorry sidn't have the brush selected in the screen shot but the terrain image is in both places. I use Gimp would that cause a difference?

I just started the project so I will start over and see what happens


#13 slewin

slewin

    Advanced Member

  • Members
  • PipPipPip
  • 400 posts

Posted 23 September 2018 - 03:53 AM

I’d turn those normal maps down as a start.
Not quite why it’s not working however.

#14 chrismess13

chrismess13

    Advanced Member

  • Members
  • PipPipPip
  • 75 posts
  • LocationButte County, CA

Posted 02 October 2018 - 12:32 AM

Thanks for all the input everyone. I have tried every suggestion, changed settings from one end to the other, restarted the project and always get the same results everytime. So I guess Im skipping this. To bad because it looks great.


#15 Justin9926

Justin9926

    Advanced Member

  • Members
  • PipPipPip
  • 760 posts

Posted 02 October 2018 - 02:11 PM

Hi Chrismess13, 


To me it looks like your Google overlay or Bing overlay is not correct. The overlay image should completely fill the the box when selected like it shows on NoPutt's image. Yours doesn't fill the whole square as shown.

ywouffU.jpg

If you're still interested in trying this method. Give me a PM and if the course has lidar, I can put a unity packet together for you so you can try.


Justin


Asus ROG G751JT-CH71 Gaming Laptop

2.5 GHz Intel Core i7– 4710HQ

Nvidia GTX 970M 3GB GDDR5

16 GB DDR3

Windows 10 64-bit


#16 rfaddis

rfaddis

    Newbie

  • Members
  • Pip
  • 5 posts

Posted 15 November 2018 - 12:43 AM

I am having the same issue as Chrismess13 with the normal map showing through the spline instead of the overlay. I have read the above and tried several setting without success. Any assistance would be appreciated.


#17 Mike Jones

Mike Jones

    Advanced Member

  • Administrators
  • 6,159 posts

Posted 15 November 2018 - 05:57 PM

I am having the same issue as Chrismess13 with the normal map showing through the spline instead of the overlay. I have read the above and tried several setting without success. Any assistance would be appreciated.


You should not have any normal map in the normal 1 slot. 


#18 Stingreye

Stingreye

    Advanced Member

  • Members
  • PipPipPip
  • 341 posts
  • LocationSouthern California

Posted 25 November 2018 - 09:48 PM

https://media.discor...1202&height=677

20181124231938_1.jpg?width=1202&height=6
I have been playing with this technique and having a lot of fun! Thanks for the tutorial!!

Also I think some of the errors above are related to having the normal “opacity” (I am guessing that is what it is). To 1. I had to lower my normal 2 to .10 to .20 to get the look I wanted.


#19 Drrobmiller

Drrobmiller

    Advanced Member

  • Members
  • PipPipPip
  • 529 posts
  • LocationLong island

Posted 29 November 2018 - 08:05 PM

studying this tutorial plus DPs...

very cool stuff. the only way to go when doing real life courses

Thanks

Rob


Reply to this topic


0 user(s) are reading this topic

0 members, 0 guests, 0 anonymous users