Jump to content


Photo

How do we properly set up a Unity terrain?


  • Please log in to reply
40 replies to this topic

#21 Keith

Keith

    Advanced Member

  • Members
  • PipPipPip
  • 411 posts
  • LocationGeorgia, USA

Posted 13 August 2013 - 03:51 PM

My guess is that if you use the basic, free Unity app you will get the standard water features, which is basically water planes that you can drag into the scene. They are very simple,  gloppy-looking things with very few choices for colors and wave frequency. They do not reflect the landscape or allow specular highlights to reflect the sun, they just lie there like flat, sirupy, water things who do look barely adequate from 1000 yards away but do not pass muster when exposed to closer scrutiny.

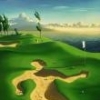
I'm pretty sure that THIS (click on "THIS"), can not be accomplished with the free version of Unity and with the CourseForge. I'm referring to the water, not the bulkheads. 

There is an advanced water package for 75 $ in the Unity Store that should offer more, and I might even be willing to purchase it at a later date, but not before the game is out, the Forge is working and my design workflow has been stabilized. It might offer more realistic waves, but I don't know if it allows for streaming whitewater or slow, rolling ocean breakers. As for waterfalls like in the PGA Range, which I haven't seen myself yet due to the Windows-centric Macastrophy that is PP, I would suspect that these are made by particle effects.

Getting, creating and including some good water stuff into my course designs is currently my biggest worry. 

Yeah, I have played around with the basic water in my scatterbrained Unity landscapes.  It is fairly staightforward, but very plain and blah like you said.  I guess they don't call it basic for nothing.  I am also sticking with the free Unity packages until I know CF is something I can be completely competent with, and even then I am not sure about buying a 75.00 package.  I may just make do with what is available.  Nice to know the PP guys may throw us a bone and include some vegetation materials with CF.

The screenshot you posted is stunning.  I was wondering about bulkheads as well.  What course is that?  Nice to know more tutorials are coming eventually Mike.


#22 Mike Jones

Mike Jones

    Advanced Member

  • Administrators
  • 6,159 posts

Posted 13 August 2013 - 04:00 PM

There are some nice Unity indy water packages out there and we're still discussing with Unity the possibility of procedurally adding the pro shader to all water meshes in PerfectGolf which will mean if you define it as water in CF then it will look like water in PG! 


WKD, the course I posted a picture of is 'ShadowLands' , a conversion of one of my 'Links' courses.


#23 Kablammo11

Kablammo11

    Obscure Person

  • Members
  • PipPipPip
  • 3,953 posts

Posted 13 August 2013 - 04:50 PM

Great news about that water situation, Mike, I do hope something can be arranged in that department. Thank you.

@WKD: As Mike says: He's the visual genius, I merely linked to his work.


>>>>>>> Ka-Boom!


• Mulligan Municipal • Willow Heath • Pommeroy • Karen • Five Sisters • Xaxnax Borealis • Aroha • Prison Puttˆ

• The Upchuck   The Shogun  • Black Swan (•)


<<<<<


#24 Acrilix

Acrilix

    Advanced Member

  • Members
  • PipPipPip
  • 1,832 posts
  • LocationBedford, UK

Posted 13 August 2013 - 04:53 PM

I still haven't bothered playing around with Unity yet, but would it be possible for a designer to hand his finished course to someone who has the Pro water package for them to update it for them?

I have no idea how much work would be involved, but this could be a solution if it is actually possible.

I'm sure some of the more wealthy, committed, (or 'Blackbeardy' types like me) could help out the ones who could not justify the expense of such a package just to release a free course.


life ................... don't talk to me about life ................

#25 IanD

IanD

    Advanced Member

  • Members
  • PipPipPip
  • 3,371 posts

Posted 07 February 2014 - 07:31 AM

K11 & Highfade..


May I ask if you can perhaps display your Terrain Inspector settings within here for aid in how you have setup your resolutions please? (this is in regards to your beta testing course images seen elsewhere within these forums)


2h30cxz.jpg


Something similar to above would be great.


Hopefully, this will allow a little more user friendly basics become easier to those starting out.


I appreciate, as above comments, the scale of the plot depending upon the detail may be cause for variances, but many appear to be looking at several ways to setup the course they're aiming to design. Personally, I'm looking to simply create a terrain and overlay an image of the course, and begin adjusting the heights. Nothing more, naturally until the CF appears.


There are many tutorials regarding Unity, but as most of them try and begin a huge learning curve, I'm hopeful we can avoid the un-necessary mountain of learning to help several wannabe's become properly equipped at the outset.


Thanks for your assistance..!


#26 Kablammo11

Kablammo11

    Obscure Person

  • Members
  • PipPipPip
  • 3,953 posts

Posted 07 February 2014 - 08:58 AM

There you go, Ian - as always letting me carry you up the mountain of learning. Sooner or later, you will have to do some walking on your own. You're a big boy, you can do it!


TerrainSettings_zps56612ab0.jpg


I aksed a few times for exactly this, the same thing, and received exactly ZERO instructions from PP of what the ideal CF specs were. I even included, in my rather voluminous private posts about observations and suggestions, the request that this sort of a screen cap should be included.

In all fairness, the few staunch heroes of PP have so much stuff to attend to, it would be harsh to expect them to tend to each and every detail with speed. Knowing what I know now, all the endless little things to keep in mind, I can only shudder at the thought of what it must be like for them.


So I can't really help you with my own settings. Some might be wrong. The Control Texture Resolution, btw, is too low for me at 512. That value determines the resolution of the terrain textures you paint onto the terrain. If it is too low, you will get blocky outlines of your textures and also the small brushes will create square fields instead of more rounded blots. If I tried to crank that up, I would lose all my textures and would have to re-apply them.

Just one example for the many, delicious pitfalls lurking on your path. 

Try this: http://docs.unity3d.com/Documentation/Components/terrain-OtherSettings.html


>>>>>>> Ka-Boom!


• Mulligan Municipal • Willow Heath • Pommeroy • Karen • Five Sisters • Xaxnax Borealis • Aroha • Prison Puttˆ

• The Upchuck   The Shogun  • Black Swan (•)


<<<<<


#27 IanD

IanD

    Advanced Member

  • Members
  • PipPipPip
  • 3,371 posts

Posted 07 February 2014 - 09:33 AM

Again, thanks for your help in detailing what I asked..! It will certainly aid a few, and myself in further understanding the necessary details when seeking to start a project.


As for walking on my own... I have all the right equipment, and actually just reminded myself of the stereotypical types around clique golf clubs.. I look the part, but can't actually play.. :D  However, that doesn't mean I won't... the initial screen image above was one of my own..


#28 AndyJumbo

AndyJumbo

    Advanced Member

  • Members
  • PipPipPip
  • 105 posts

Posted 07 February 2014 - 10:58 AM

Hey guys, you are good with those stuff, good job!


#29 highfade

highfade

    Advanced Member

  • Members
  • PipPipPip
  • 1,749 posts
  • LocationSouth Africa

Posted 08 February 2014 - 11:47 AM

Pixel Error is the one setting i move around a lot. Setting it low makes my display card sing like canary so with terrain painting I set it a bit higher.


I haven't done any real planting so Tree & objects are default. Resolution I set to the suggested settings in the tutorial.


7w60.jpg


  • IanD likes this

Intel Core i5-6600 CPU 3.3 GHz       Geforce GTX 1060        16GB  RAM       Windows 10 64 bit

Hazyview  (600m above sea level)    --   Nautilus Bay  (Revamp done)  --  Cape Fear  (TGC  adaptation)  --  Aloe Ridge  --  Nahoon Reef GC  --  Chambers Bay 

Abel's Crossing  --  Solitude Links GC


#30 IanD

IanD

    Advanced Member

  • Members
  • PipPipPip
  • 3,371 posts

Posted 09 February 2014 - 08:37 PM

Thanks for your help highfade too... it gives me something to experiment and feel safer with, regarding moving on and learning more with Unity. I had played with it, but felt i needed something more solid to see results with, and care about lol..


20acpeb.jpg


It isn't much, but I've thought it matters in terms of what I know and feel comfortable achieving.


I simply made a TGA overlay and scaled it to suit the terrain I was going to work with. It is a real course I grew up learning to play golf on. It has alot of memories for me, including a 162 first ever round when I was about 12 or 13yrs old back in 1980. Lost 12 balls that day, but it's still a day I'll never forget. Life is always about learning... and I did that day lol. However, it was only a munipal course and I've always felt it could be a great course. So, I'm going to make it, as I would have created it... that means I'm free to do as I want.


Once the overlay was added, I've now and adjusted the elevation across the whole plot as I know it to be. Living around the area for 30 years, you tend to know where the heights were and the views gained across parts of the course as well as the tees. I shan't focus on the surrounding houses, and as two sides had open farming fields.. I'll encompass the lot in something similar. 3D modelling comes later I think..


So, now I simply await the CF to begin fine tuning the terrain for each hole and being able to turn off the overlay and paint some textures.


So.. with a pair showing and taking three cards... I'm in.


#31 shimonko

shimonko

    Advanced Member

  • Members
  • PipPipPip
  • 1,718 posts

Posted 09 February 2014 - 10:43 PM

What resolution was your TGA overlay image Ian, because it's displaying above at about what Unity downscales textures to by default - 1024x1024. 


If your overlay image is more than this, click on it in the Assets window and up the Max Size appropriately, and change colors from Compressed (4096 colors) to 16-bit (65536 colors)


#32 highfade

highfade

    Advanced Member

  • Members
  • PipPipPip
  • 1,749 posts
  • LocationSouth Africa

Posted 10 February 2014 - 06:41 AM

What resolution was your TGA overlay image Ian, because it's displaying above at about what Unity downscales textures to by default - 1024x1024. 


If your overlay image is more than this, click on it in the Assets window and up the Max Size appropriately, and change colors from Compressed (4096 colors) to 16-bit (65536 colors)


Great tip, it makes a huge  difference. 


Intel Core i5-6600 CPU 3.3 GHz       Geforce GTX 1060        16GB  RAM       Windows 10 64 bit

Hazyview  (600m above sea level)    --   Nautilus Bay  (Revamp done)  --  Cape Fear  (TGC  adaptation)  --  Aloe Ridge  --  Nahoon Reef GC  --  Chambers Bay 

Abel's Crossing  --  Solitude Links GC


#33 Kablammo11

Kablammo11

    Obscure Person

  • Members
  • PipPipPip
  • 3,953 posts

Posted 10 February 2014 - 07:24 AM

Hehe - another one of those "little" Untiy things nobody ever tells you about. Good catch, shin!


Ian, I see you set your terrain to 1400 x 1600 meters. With your height map having to be square with equal length and width and extending all over your terrain, I wonder if that would not mean that you have your elevation a little bit distorted. You should propably make your terrain 1600 by 1600.


>>>>>>> Ka-Boom!


• Mulligan Municipal • Willow Heath • Pommeroy • Karen • Five Sisters • Xaxnax Borealis • Aroha • Prison Puttˆ

• The Upchuck   The Shogun  • Black Swan (•)


<<<<<


#34 shimonko

shimonko

    Advanced Member

  • Members
  • PipPipPip
  • 1,718 posts

Posted 10 February 2014 - 09:20 AM

I don't think it matters too much K11 when you're hand sculpting by eye like Ian's doing here (i.e., not importing a real heightmap) as you just sculpt until it looks right. The terrain sculpting brushes will be slightly ovalled but all the textures (including the overlay), trees and grasses will be fine.  


#35 IanD

IanD

    Advanced Member

  • Members
  • PipPipPip
  • 3,371 posts

Posted 10 February 2014 - 03:03 PM

Wow.. what a tip... THANKS!


10curs7.jpg


Without these little gems of info, it would be alot harder to identify the little areas that hopefully will aid in making a decent course design, a little better.


Just goes to show how at every stage, there is alot to learn.


As for the terrain size, I'm simply hand sculpting, as Shimonko states, so I'm avoiding the heightmap issues. I get the feeling most real courses would benefit from the heightmap info, but as I'm not concerned with replicating the exact course, but more accentuating it, I didn't want to go in that direction. It would take ages to gain the data too. I can actually gain a little information regarding basic heights from this site here ;


Elevation Finder


#36 IanD

IanD

    Advanced Member

  • Members
  • PipPipPip
  • 3,371 posts

Posted 15 February 2014 - 07:54 AM

Thought I'd continue my little playabout further with an image regarding some (badly) aligned textures..


33cwwuu.jpg


So, in essense, continuing from above whereas starting with a TGA image over the terrain, I've tried painting some textures. The ones I have tried represent the fairway, bunker and a very bad attempt at a green. Now, without the CF I cannot easily create outlines to the shapes but I thought I'd be brave enough to show something as I've been kicking this thing about for some time now.


I like the fairway texture, but that's a 1024 x 1024 tiled at 2. Whereas the green and sand are 512 both tiled at 5. It's something of a balance trying to establish a reasonable looking texture, without tying yourself to anything specific. I love the ability to keep tweaking and adjusting and returning. I have a wad of note paper next to the pc though, as I'm often forgetting where I am regarding what file and what project I have open... backing up has never been so important again (thought those days for me had gone...sigh lol).


Anyway... I've tried.. I'm still trying... I'd like to see a few more give it a try using Unity, even if they feel their work is as amateurish as mine... if you're serious about creating a Course, you're wiser to start now, honestly..!


  • Kablammo11 likes this

#37 IanD

IanD

    Advanced Member

  • Members
  • PipPipPip
  • 3,371 posts

Posted 15 February 2014 - 08:26 AM

9ut509.jpg


Had another go at a green texture.. seems to work alot better at 1024 x 1024 tiled at 2..


#38 Kablammo11

Kablammo11

    Obscure Person

  • Members
  • PipPipPip
  • 3,953 posts

Posted 15 February 2014 - 09:22 AM

Looking good, IanD. That's exactly how I made my few first steps a few months ago. If you increased your Control Texture Resolution from 1024 to 2048, you could get the edges of the textures a little be more sharper (But you would have to re-paint all your textures). Still some tiling to be seen, though. 

But it's evident that you're learning, and that's what matters most -  and you will keep learning more with time. Now, if on top of learning and struggling you also are having fun while dreaming about what may be and discovering things you never thought were there for you to discover… you're a winner! 


  • IanD likes this

>>>>>>> Ka-Boom!


• Mulligan Municipal • Willow Heath • Pommeroy • Karen • Five Sisters • Xaxnax Borealis • Aroha • Prison Puttˆ

• The Upchuck   The Shogun  • Black Swan (•)


<<<<<


#39 IanD

IanD

    Advanced Member

  • Members
  • PipPipPip
  • 3,371 posts

Posted 15 February 2014 - 10:02 AM

Yep, good tip... I can imagine that may be quite helpful for those areas yet to be defined by the CF.. whatever they may be for those who want them.


Does the CF possess a basic shape function that isn't assigned to anything such as rough, fairway, green etc..? In other words, can something be created that has no other purpose but a visual aid in defining a shape..?


#40 Kablammo11

Kablammo11

    Obscure Person

  • Members
  • PipPipPip
  • 3,953 posts

Posted 15 February 2014 - 10:29 AM

CF shapes/meshes are defined by a spline, which is defined by control points. They will give you a clear, round, sharp edge at the outside (which you can softly blend into the neighbouring mesh if you want to). You can manipulate the control points, which in return alter the curvature of the spline and the shape of its outline, at any stage of your course construction. Is your fairway too large or too narrow? Shift the control points to adapt it. 

CF also gives you functions to visually filter out meshes that might be in the way of your work. If you first draw a fairway, for example, and then wish to draw in a fairway bunker, then you can make that fairway invisible and use the base course overhead texture on the terrain to find and precisely locate the bunker and draw it's outline


Upping the Control Texture Resolution only affects the textures applied to your terrain, not the CF meshes. You may influence their resolutions as well via the CF Layers Library. In there, you may also clone existing meshes and assign to them any texture you want: wastebunker, gravel path, pot bunker peat layers, Japanese stone garden, disco floor, and add them to your course wherever you like. Ample room for you to go wild.


>>>>>>> Ka-Boom!


• Mulligan Municipal • Willow Heath • Pommeroy • Karen • Five Sisters • Xaxnax Borealis • Aroha • Prison Puttˆ

• The Upchuck   The Shogun  • Black Swan (•)


<<<<<


1 user(s) are reading this topic

0 members, 1 guests, 0 anonymous users