Jump to content


Photo

Re-adding trees, textures and grasses


  • Please log in to reply
15 replies to this topic

#1 jt83

jt83

    Advanced Member

  • Members
  • PipPipPip
  • 1,029 posts

Posted 23 May 2017 - 07:50 AM

I'm pretty sure that at the start of my project the default trees, textures and grasses were all in my Inspector but now they're gone...under trees I see 'no trees defined' and under texture I only see the overlay image for the heightmap -


25105150734ce1df794403699ca618386ccfc7fa


Do I have to add them all again individually?  Surely they're still in a folder in the Project section.  No quick fix here?


#2 Kablammo11

Kablammo11

    Obscure Person

  • Members
  • PipPipPip
  • 3,953 posts

Posted 23 May 2017 - 08:47 AM

It looks like you have 2 terrains going on in your project - presumably the original default one, where all the trees and textures are preloaded, and a new one with your real course height map and satellite overlay, where they need to be assigned to.

For every new terrain you need to manually add the textures, plants and trees again. They are tucked away somewhere in your project assets folder, so they are still around. If you highlight the original terrain, they still should show up.


>>>>>>> Ka-Boom!


• Mulligan Municipal • Willow Heath • Pommeroy • Karen • Five Sisters • Xaxnax Borealis • Aroha • Prison Puttˆ

• The Upchuck   The Shogun  • Black Swan (•)


<<<<<


#3 Crow357

Crow357

    Advanced Member

  • Administrators
  • 4,670 posts

Posted 23 May 2017 - 11:51 AM

This is what my Unity looks like if I open another project, then go back to my original.  Try double clicking on the scene name in the project window. 


Win 10, i7-7700 @4.2 ghz, 16GB DDR4, EVGA GTX 1080
Swing Type: Tour Pro Wireless XBox 360 Controller.

#4 jt83

jt83

    Advanced Member

  • Members
  • PipPipPip
  • 1,029 posts

Posted 24 May 2017 - 12:37 AM

This is what my Unity looks like if I open another project, then go back to my original.  Try double clicking on the scene name in the project window. 


Tried, but didn't work.  I normally don't go from one project to another as I only have two, the CF tutorial and my project  :P


It looks like you have 2 terrains going on in your project - presumably the original default one, where all the trees and textures are preloaded, and a new one with your real course height map and satellite overlay, where they need to be assigned to.

For every new terrain you need to manually add the textures, plants and trees again. They are tucked away somewhere in your project assets folder, so they are still around. If you highlight the original terrain, they still should show up.


I clicked on New Terrain and New Terrain 1, then clicked Open in Inspector but nothing happened - I guess because I haven't done anything to the terrain except add splines.


Looks like I'll have to add them back in manually.  A bit annoying because I'd gotten used to the order of them in the tutorial and the trees, grasses and textures are all in different folders in Project, so it just adds time.  If there's no way around it then there's no way around it  :mellow:


Edit - I should make it clear I have no idea how I ended up with New Terrain and New Terrain 1.  I just followed the steps to import a heightmap and started working.  When I start working on the terrain and saving it through the CF menu, will I start getting folders like New Terrain 2, New Terrain 3 etc?  How does this differ to the Terrain in Hierarchy?  I'm actually having fun in CF now, so I hope it doesn't seem like I'm panicking, I'm just slowly building knowledge...


#5 worrybirdie

worrybirdie

    Advanced Member

  • Members
  • PipPipPip
  • 892 posts
  • LocationPismo Beach, California

Posted 24 May 2017 - 01:18 AM

This is the kind of complexity I have been criticizing in other threads.


#6 jt83

jt83

    Advanced Member

  • Members
  • PipPipPip
  • 1,029 posts

Posted 24 May 2017 - 01:34 AM

We'll get there!


#7 Kablammo11

Kablammo11

    Obscure Person

  • Members
  • PipPipPip
  • 3,953 posts

Posted 24 May 2017 - 04:35 PM

Yup, good attitude!

I see only one scene in your assets, but I'm not sure if you backed up the original project and got the New Terrain 1 from there - I don't use that functionality myself, yet I thought that if you backed up your terrain through the CF menu you would get a different name with a precise date as a result. Unity usually adds a 1, 2, 3 etc to all new objects that are generated in sequence and use their default name...

I can't tell you much more about the CF terrain backup thing, others around here may be more familiar with it: My understanding is that it saves both your CF meshwork and the terrain editor status including height maps, planting and textures. And that it goes and puts a lot of additional MBs or even GBs in your project folder...


Which leads me back to suspect again that you have a case of mistaken terrain identity. Why would you have the texture overlay in slot 1, where it belongs? How did it get there, and did this somehow delete all the preloads?  Is there something I don't know about in the lidar import procedure that voids all terrain settings? Since I don't do real courses, I'm afraid I do not have a productive answer.


Here's two virtual feelgood pills for you, kaboom-grade, take them in the morning, then try to suss this one out yourself - it's a learning opportunity no matter what and you strike me as the kind of person that does have the mindset and the wherewithal to solve this. If the symptoms should persist, send me a PM to set up a Skype screenshare session to do a bit of detail analysis. Or to any other designer of your choice, provided they agree.

Or, best case, pray that coach Mike descends to us mere mortals from the designer skies on a golden steed and makes your issue go away with one, short and poignant observation...


  • jt83 likes this

>>>>>>> Ka-Boom!


• Mulligan Municipal • Willow Heath • Pommeroy • Karen • Five Sisters • Xaxnax Borealis • Aroha • Prison Puttˆ

• The Upchuck   The Shogun  • Black Swan (•)


<<<<<


#8 Crow357

Crow357

    Advanced Member

  • Administrators
  • 4,670 posts

Posted 24 May 2017 - 04:44 PM

Did you start with the tutorial file, then import the LIDAR data as a unitypackage file and then delete the tutorial scene?  Cause all the trees and textures will be in the tutorial scene, not the one created with the unitypackage file.  Cause, I also notice you have no audio source in your heirarchy.


I have recently asked someone to send me some LIDAR data and they sent it as a unitypackage file.  When I import it, it doesn't combine with my existing scene and instead creates a new scene.  Your screenshot looks exactly like mine only I have Mike's course1 scene listed in my Project window.


Win 10, i7-7700 @4.2 ghz, 16GB DDR4, EVGA GTX 1080
Swing Type: Tour Pro Wireless XBox 360 Controller.

#9 Larrykuh

Larrykuh

    Advanced Member

  • Members
  • PipPipPip
  • 244 posts

Posted 24 May 2017 - 09:03 PM

I have recently asked someone to send me some LIDAR data and they sent it as a unitypackage file.  When I import it, it doesn't combine with my existing scene and instead creates a new scene.  Your screenshot looks exactly like mine only I have Mike's course1 scene listed in my Project window.


The lidar you received has all of the default tutorial paint textures, trees and grasses defined. If you want to modify your existing scene to use the lidar terrain and overlay, here are the steps:


1. Open the README file and write down the terrain width, length and height.

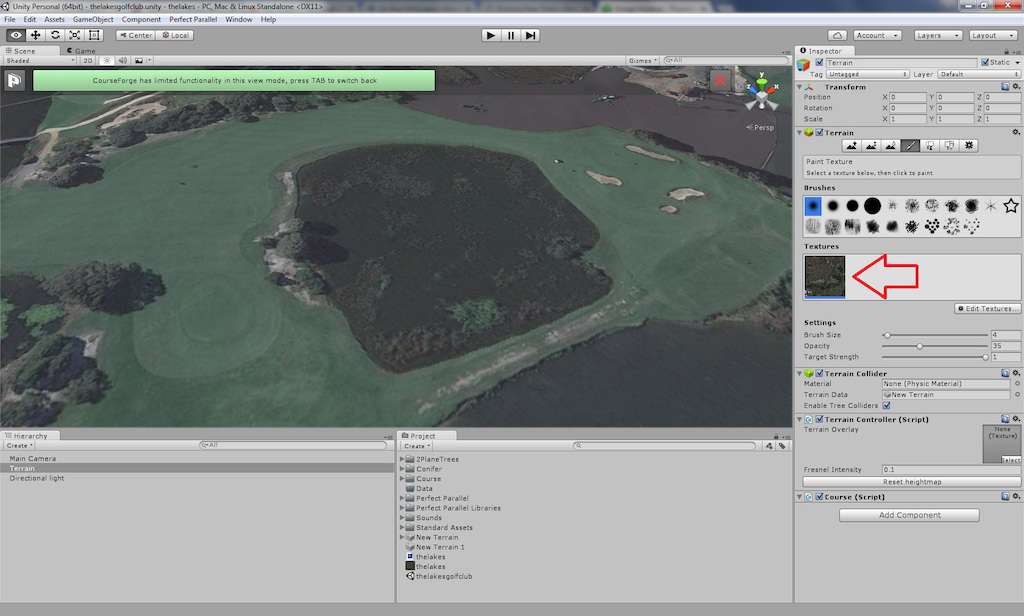
2. Select the "Terrain" in the "Hierarchy" window, then click the "Terrain Settings" button in the "Inspector".

3. Change the "Terrain Width", "Terrain Length" and "Terrain Height" from step 1.

4. Click the "Import Raw" button and navigate to the ".raw" file in "Assets/Terrain Backup" to open the "Import Heightmap" window.

5. All of the information will be correct, so click the "Import" button" to load the new lidar terrain.

6. With the Terrain selected in the "Hierarchy", click the "Paint Textures" button.

7. Double-click the first paint texture, and replace the texture by dragging the overlay image from "Project/Terrain Backup".

8. Before clicking "Apply" or closing the window, change "x:" and "y:" to the width and length from step 1.


Note: if the original scene was not an image overlay scene, you will lose the first texture. Backup the terrain from the "Perfect Parallel" menu and save your scene. The  "Audio Source" wasn't included in the package, so load the Course1 scene, copy the "Audio Source", then load the lidar scene and paste the copied "Audio Source". Save your scene again and you are all set to go.


Hopefully, you haven't drawn any splines, as you will lose them if you follow the above steps.


#10 jt83

jt83

    Advanced Member

  • Members
  • PipPipPip
  • 1,029 posts

Posted 24 May 2017 - 11:50 PM

Which leads me back to suspect again that you have a case of mistaken terrain identity. Why would you have the texture overlay in slot 1, where it belongs? How did it get there, and did this somehow delete all the preloads?  Is there something I don't know about in the lidar import procedure that voids all terrain settings? 


Lol I hope those are rhetorical questions.  Thanks for your offer btw, I may take it up.


Did you start with the tutorial file, then import the LIDAR data as a unitypackage file and then delete the tutorial scene?  Cause all the trees and textures will be in the tutorial scene, not the one created with the unitypackage file.  Cause, I also notice you have no audio source in your heirarchy.


I did not start with the tutorial file  :mellow:  I followed Joe H's videos, but I think the problem is that when he opened Unity he was using some kind or Project wizard which didn't appear for me.  I'm thinking that's where he did all his texture, grass etc importing.


Larry in my case is it better to just add what I'm missing one at a time, or is there a way to start again with all the defaults - like starting with the CF tutorial and then following your 8 steps?  I have done a bit of spline work but not so much that starting again is out of the question.  The neighbourhood will hear my swearing though.


#11 Larrykuh

Larrykuh

    Advanced Member

  • Members
  • PipPipPip
  • 244 posts

Posted 25 May 2017 - 01:39 AM

JT


In your case since you have not done much spline work. follow the steps at the end of the post. You will lose the splines you created, but you will get all of the default paint textures (except the first one), trees and grasses. Adding the trees isn't so bad, but adding the grasses manually with all of the various settings is rather tedious. You must have the Course1 scene in your project, along with your course scene and terrain. Make sure you have backups of your course scene and terrain in case something goes awry.


The only negative is you will lose your splines and first paint texture as that is where the overlay image has to be located. You can always add that texture back if you need it.


If you have any problems, PM me.


I


#12 Justin9926

Justin9926

    Advanced Member

  • Members
  • PipPipPip
  • 760 posts

Posted 25 May 2017 - 04:24 PM

Just a FYI if you guys are building your course on top of  Mike's Course1 supplied terrain.  The overlay can go in the last slot available. Just choose the last blank slot. Put your overlay in as the texture and set the Size  X and Y to the  size of the terrain  and hit apply. Then just choose that texture and set everything to 100% and paint your overlay onto the  terrain. That way  you don't have to mess with the first texture. Once you draw your splines and planting your trees you could actually remove the overlay and your terrain is textured  for the most part. Beings you did not remove the first texture. If you need to  use the overlay  again for some reason just re-add it and paint back in the area you need to see.


Asus ROG G751JT-CH71 Gaming Laptop

2.5 GHz Intel Core i7– 4710HQ

Nvidia GTX 970M 3GB GDDR5

16 GB DDR3

Windows 10 64-bit


#13 jt83

jt83

    Advanced Member

  • Members
  • PipPipPip
  • 1,029 posts

Posted 26 May 2017 - 12:03 AM

Justin does that work if you're not starting with course1?  I'm sure there will be times when I'll have to recheck the original satellite overlay of my project.


#14 Justin9926

Justin9926

    Advanced Member

  • Members
  • PipPipPip
  • 760 posts

Posted 26 May 2017 - 03:03 AM

Yes, Say you textured over an area where there were buildings and you now want to place objects back in the right place but can't remember the correct space. Just choose your overlay  for the paintbrush and paint back over that area It will put your satellite image back down. It's like a magic eraser. I think that's what you're asking right?


Asus ROG G751JT-CH71 Gaming Laptop

2.5 GHz Intel Core i7– 4710HQ

Nvidia GTX 970M 3GB GDDR5

16 GB DDR3

Windows 10 64-bit


#15 jt83

jt83

    Advanced Member

  • Members
  • PipPipPip
  • 1,029 posts

Posted 27 May 2017 - 01:56 AM

Yes, Say you textured over an area where there were buildings and you now want to place objects back in the right place but can't remember the correct space. Just choose your overlay  for the paintbrush and paint back over that area It will put your satellite image back down. It's like a magic eraser. I think that's what you're asking right?


Exactly what I was asking.


Just a FYI if you guys are building your course on top of  Mike's Course1 supplied terrain.  The overlay can go in the last slot available. Just choose the last blank slot. Put your overlay in as the texture and set the Size  X and Y to the  size of the terrain  and hit apply. Then just choose that texture and set everything to 100% and paint your overlay onto the  terrain. That way  you don't have to mess with the first texture. Once you draw your splines and planting your trees you could actually remove the overlay and your terrain is textured  for the most part. Beings you did not remove the first texture. If you need to  use the overlay  again for some reason just re-add it and paint back in the area you need to see.


You mentioned that the overlay can go in the last texture slot, but I don't appear to have a blank - all 8 squares are occupied.  Do I have to get rid of one to create a blank slot?


#16 Kablammo11

Kablammo11

    Obscure Person

  • Members
  • PipPipPip
  • 3,953 posts

Posted 27 May 2017 - 09:16 AM

You mentioned that the overlay can go in the last texture slot, but I don't appear to have a blank - all 8 squares are occupied.  Do I have to get rid of one to create a blank slot?


Nope. You click on the button that says Edit Textures - bottom right of the texture palette. There you can choose to Edit an existing texture (you could also double-click on the thumbnail in the palette for that), to delete a highlighted texture OR to add a new one. 

Selecting to add a new one will open a blank texture edit insert. Drag your overlay texture into the blank thumbnail slot and insert the terrain size for width and height. Click ok and the new texture will automatically be assigned to the back of the queue in a new slot 9. You will have to paint it over all the other textures to see it, like Justin said, though, otherwise it will remain invisible.


Same procedure, btw, if you want to add, remove or switch out grass billboards or trees. 

For more, read up on the subject matter here: https://docs.unity3d.com/Manual/terrain-Textures.html

You might want to peruse all the 7 sub-paragraphs in the terrain editor section of this Manual, btw. 


>>>>>>> Ka-Boom!


• Mulligan Municipal • Willow Heath • Pommeroy • Karen • Five Sisters • Xaxnax Borealis • Aroha • Prison Puttˆ

• The Upchuck   The Shogun  • Black Swan (•)


<<<<<


0 user(s) are reading this topic

0 members, 0 guests, 0 anonymous users