

I only was aware of the shift-option to delete points. If I need to add one more I always simply double click one point and it generates one more next to it.

57 replies to this topic
#42

nstone73
-

- Members
-

- 146 posts
Advanced Member
- LocationDenver CO
Posted 05 July 2019 - 07:39 PM
Yep...fair enough, the ctrl is redundant
#43
Krotus
-
- Members
-
- 27 posts
Member
Posted 06 July 2019 - 07:38 AM
Is it possible you had 2 overlapping control points? When I double click to finish a spline, I don't do it on another point, you'll end up with 2 side by side or right over each other.
Good question but definitely not. I have many, many years of experience with Bezier curves and c-splines.
- DPRoberts likes this
#44
DPRoberts
-

- Members
-
- 1,610 posts
Advanced Member
Posted 06 July 2019 - 11:00 AM
Good question but definitely not. I have many, many years of experience with Bezier curves and c-splines.
Excited to see what you can turn out! You will find that CF and the layers library contain a few gremlins.
It won't take you long to navigate past all the little issues and you'll find a process that is predictable.
I find the control points and spline management a bit cumbersome over something like Photoshop where you can manage with less points.
As an FYI, you can change the number of control points that a spline produces.
Additionally, you can use a layer to draw the points and then change the layer type.
The way this may be useful -
Say you want a tee box to be an elaborate shape but the "tee" layer doesn't produce the points to carry the detail you are after. Choose "bunker", draw your shape and then change the layer to "tee". It will calculate the tee mesh based on the tee grid fill settings but keep the number of bunker spline points.
Hopefully, that makes sense...
- axe360 and Birdie like this
#45
Birdie
-

- Members
-
- 456 posts
Advanced Member
Posted 06 July 2019 - 02:33 PM
Say you want a tee box to be an elaborate shape but the "tee" layer doesn't produce the points to carry the detail you are after. Choose "bunker", draw your shape and then change the layer to "tee". It will calculate the tee mesh based on the tee grid fill settings but keep the number of bunker spline points.
Hopefully, that makes sense...
Cool! Sure I sometimes changed a layer afterwards here or there for whatever reason but didn't know it works that way inside of the box.
So if you recalculate the tee or all splines again it will keep the Bunker mesh settings inside the tee box? Could have saved me a bunch of additionally created lib layers maybe.
One more thing to add because you also mentioned it, i found it very helpful to change my cartpath grid settings to I think 8-2-8. That way it keeps the corners very smooth means the mesh very fine but there are a lot less points to adjust afterwards.
#46
Birdie
-
- Members
-
- 456 posts
Advanced Member
Posted 06 July 2019 - 03:00 PM
DP, is it then also possible to let's say layout a densly meshed fairway and at a later point for adjusting its shape change it to maybe a same density but low control point fairway layer and it would keep the dense mesh inside? Sure you would lose some fine control but it's sometimes very painful to move big amounts of control points one by one. It's probably wise to have your settings before splining the course but as I now have nearly finished splining I ask for this afterwards possibility.
Or would I only mess things up?
Or would I only mess things up?
#47
DPRoberts
-
- Members
-
- 1,610 posts
Advanced Member
Posted 06 July 2019 - 03:03 PM
Cool! Sure I sometimes changed a layer afterwards here or there for whatever reason but didn't know it works that way inside of the box.
So if you recalculate the tee or all splines again it will keep the Bunker mesh settings inside the tee box? Could have saved me a bunch of additionally created lib layers maybe.
Guessing this is a lost in translation thing Birdie...
The mesh triangles will be dictated by whatever the final selection for the layer is.
The spline control points are dictated by whatever you start or create the spline with...
I was just saying you can have more outer control points with something like "bunker" and then change it to "tee" if you want the tee texture and mesh settings.
#48
Birdie
-
- Members
-
- 456 posts
Advanced Member
Posted 06 July 2019 - 03:54 PM
Okay, didn't have the texture aspect in mind.
But if I duplicate a lib layer, let's say fairway, and only lower the control points in the duplicated one, change my already layed out fairway to this one and recalculate, should this work in the way to keep my fairway as it is with just less control points?
I already work with a lowered Bunker setting but was never sure if I could change my bunch of older Bunkers which have the original denser settings to the lowered without messing things up.
#49
DPRoberts
-
- Members
-
- 1,610 posts
Advanced Member
Posted 06 July 2019 - 04:04 PM
Okay, didn't have the texture aspect in mind.
But if I duplicate a lib layer, let's say fairway, and only lower the control points in the duplicated one, change my already layed out fairway to this one and recalculate, should this work in the way to keep my fairway as it is with just less control points?
The number of control points on the spline occur at the time of laying out the original spline and do not change regardless of any later change in settings. So, no, unfortunately, you can only decrease the number of control points by manually deleting them after the mesh has been calculated for the first time.
If I'm looking to have a reduced or increased number of control points, I don't always "start" with the layer that I intend to calculate the spline with.
#50
Birdie
-
- Members
-
- 456 posts
Advanced Member
Posted 06 July 2019 - 05:55 PM
Alright and thanks, that's clear now. And makes sense how you workaround it.
On the other hand even deleting and reshaping bigger splines, which always made me a little headache because of this big amount of control points, is now an option again with the knowledge of possible dense meshes with less control points. If I will ever start building another course finetuning splines will definitely no more that time consuming.
On the other hand even deleting and reshaping bigger splines, which always made me a little headache because of this big amount of control points, is now an option again with the knowledge of possible dense meshes with less control points. If I will ever start building another course finetuning splines will definitely no more that time consuming.
- DPRoberts likes this
#51
DPRoberts
-
- Members
-
- 1,610 posts
Advanced Member
Posted 06 July 2019 - 06:38 PM
8m spline point creation seems to work well for rough, semi rough and fairway for me. I prefer to add points versus remove them.
The green and bunker setting is pretty good. The tee layer doesn't have enough for smaller boxes.
The green and bunker setting is pretty good. The tee layer doesn't have enough for smaller boxes.
- Joe Habiger, Birdie and Stingreye like this
#52
Birdie
-
- Members
-
- 456 posts
Advanced Member
Posted 06 July 2019 - 07:47 PM
Yes, was thinking the same when i tried the 8m cartpath. "This probably should work on fairways too, if i only knew this 6 months ago. Would have saved my fingers a million clicks and movers...  "
"
- Joe Habiger likes this
#53
Stingreye
-

- Members
-
- 341 posts
Advanced Member
- LocationSouthern California
Posted 06 July 2019 - 09:40 PM
This should be a..... "welcome to course forge and unity thread". I think EVERY designer has gone through these exact pains multiple times. I think a key here worth remembering:
-The outter most spline can overlap splines of the same type. SO everything can look great and you think you are in the clear, and you add one more spline around, then everything corrupts. Its not always that new spline that's the problem, its ONE further deep because it allows the outter most spline to overlap without corruption.
Hope that's a clear summary / explanation but I think its important to understand, it makes troubleshooting ALOT easier.
#54
Krotus
-
- Members
-
- 27 posts
Member
Posted 06 July 2019 - 10:14 PM
This should be a..... "welcome to course forge and unity thread". I think EVERY designer has gone through these exact pains multiple times. I think a key here worth remembering:
-The outter most spline can overlap splines of the same type. SO everything can look great and you think you are in the clear, and you add one more spline around, then everything corrupts. Its not always that new spline that's the problem, its ONE further deep because it allows the outter most spline to overlap without corruption.
Hope that's a clear summary / explanation but I think its important to understand, it makes troubleshooting ALOT easier.
I managed to finally get a rough around the 3 holes I had completed. What I found is what you said - the last outermost spline can appear to be the issue but it may not be. In my case, I had to zoom in quite close and I found that on each of the 3 holes I was adding a rough spline to, the inner roughsemi spline had 1 or 2 small kinks or jags. Very hard to find. The fact that CF builds these splines just fine if they are the outermost spline is annoying. A nice feature would be the ability to set a node angle threshold so that any spline that had nodes creating a spline angle past the threshold would highlight to alert the user that there was a problem.
#55
Krotus
-
- Members
-
- 27 posts
Member
Posted 07 July 2019 - 03:51 AM
I think a key here worth remembering:
-The outter most spline can overlap splines of the same type. SO everything can look great and you think you are in the clear, and you add one more spline around, then everything corrupts. Its not always that new spline that's the problem, its ONE further deep because it allows the outter most spline to overlap without corruption.
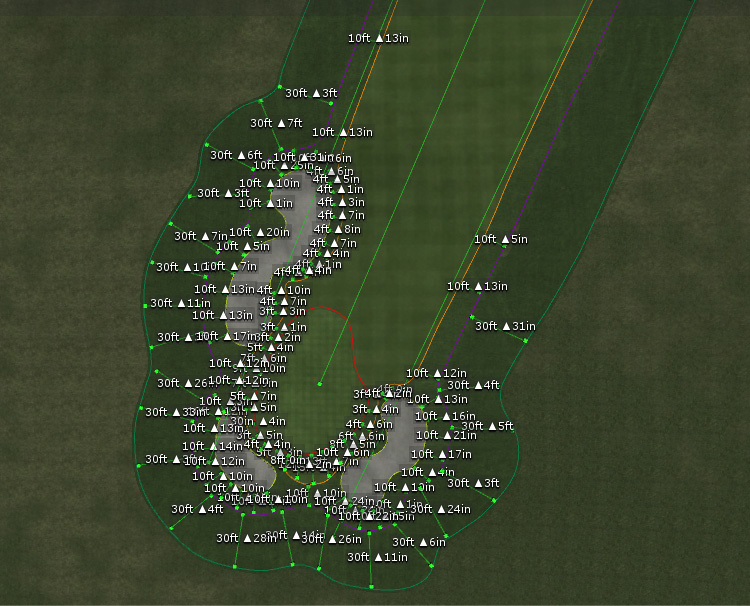
Here's an example of this. In this screenshot, you can see the green, bunkers, fairway and roughsemi splines have all been drawn and built:
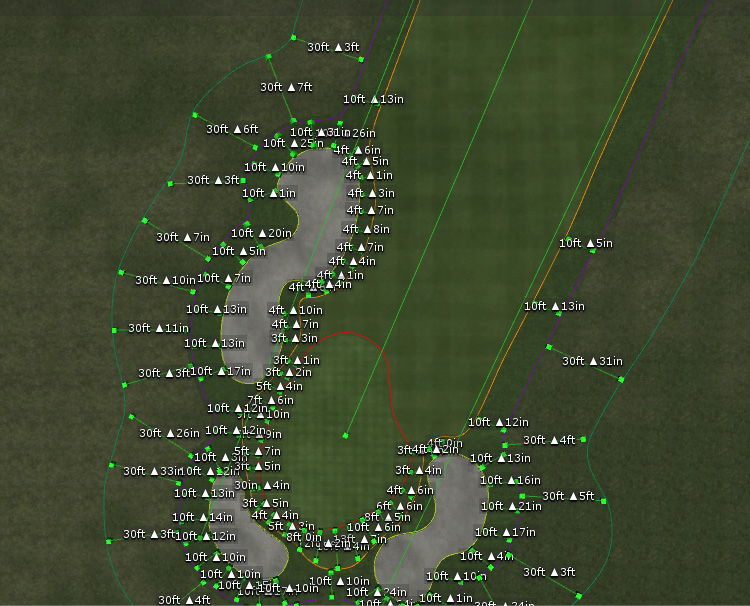
You can also see that the rough spline has been drawn but not built. If all goes well, when it is built there should not be any issues. Keep in mind that the current outer spline is the roughsemi spline. Since it is the outer spline, it can actually have some minor defect(s) and still build properly. However, if it becomes an inner spline (such as being surrounded by a rough spline) and has minor defects, then there will be issues when the new outer spline is built.
Here is what happened after the rough spline surrounding the inner spline was built:
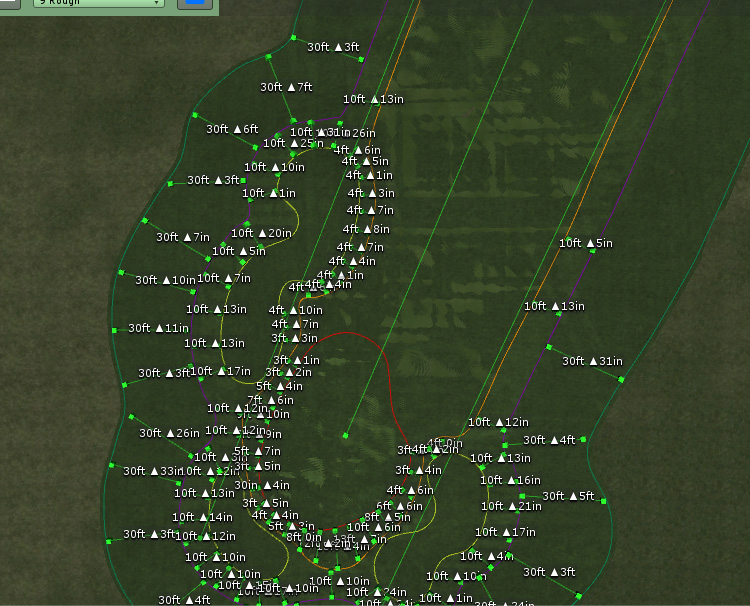
While it's possible that there is something wrong with the rough spline, the chances are pretty good that the roughsemi spline is the problem. Finding the problem(s) can be a chore and it helps if you are zoomed in quite close. It also helps if you have the Spline Tool selected and are holding down your SHIFT key so that the blend lines are displayed. if you don't, there is not much chance of you locating any issues with the spline you are investigating.
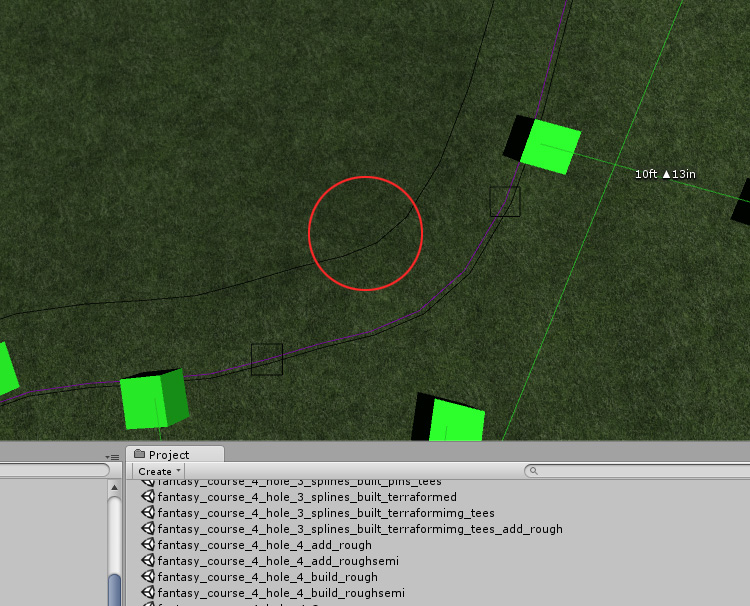
Here is the problem area in the roughsemi spline:
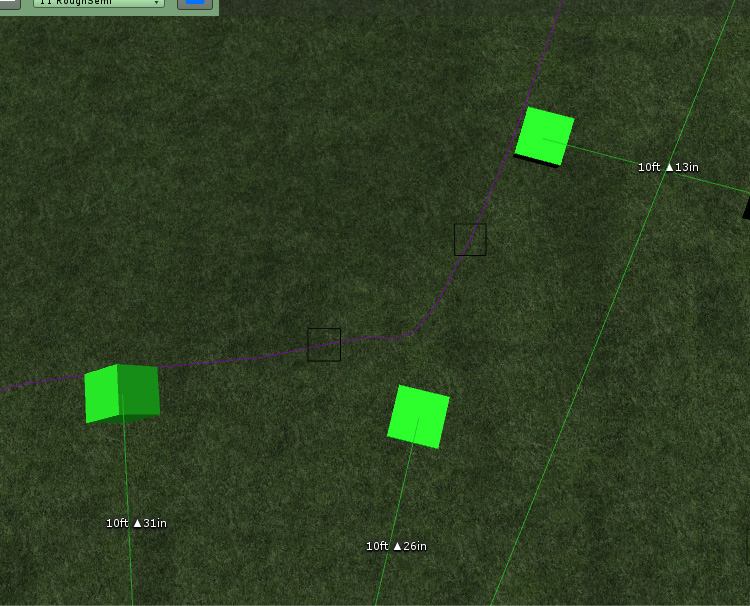
Can you see the problem? I couldn't. But now watch what happens when the blend lines are displayed:
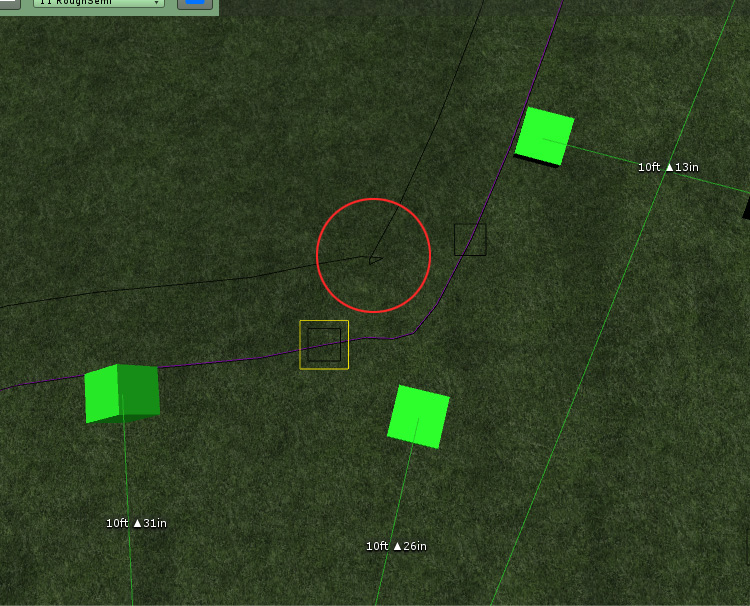
That little twist shows that the roughsemi spline's blend is crossing itself. For an outer spline, this wouldn't matter but since we have just made the roughsemi spline an inner spline by surrounding it with a rough spline, this little twist will be an issue and all of the shading of the inner splines will no longer render properly.
So I have to move those nodes in that part of the roughsemi spline a bit to get rid of that twist in the blend:

It doesn't look like much was done but here's what the blend lines look like after rebuilding the rough spline:
And you can see that the shading of all of the inner splines is now correct:
Hopefully this example will result in a future reduction of profanity and loss of hair.
- Joe Habiger, Birdie, DPRoberts and 1 other like this
#56
Birdie
-
- Members
-
- 456 posts
Advanced Member
Posted 07 July 2019 - 07:02 AM
A perfect and easy to follow explanation!
Everyone who starts building a course should be directed to this.
Thank you!
Everyone who starts building a course should be directed to this.
Thank you!
#57
nstone73
-
- Members
-
- 146 posts
Advanced Member
- LocationDenver CO
Posted 07 July 2019 - 04:59 PM
Nice explanation....quick question on your semi-rough spline....did you create it using the freehand draw tool or the point-to-point tool? Just wondering, but I don't think I've seen that issue with the point to point method. Maybe I've just been lucky...and I haven't created many courses and maybe you've been unlucky with your first holes.
#58
Krotus
-
- Members
-
- 27 posts
Member
Posted 08 July 2019 - 12:23 AM
Nice explanation....quick question on your semi-rough spline....did you create it using the freehand draw tool or the point-to-point tool? Just wondering, but I don't think I've seen that issue with the point to point method. Maybe I've just been lucky...and I haven't created many courses and maybe you've been unlucky with your first holes.
The only time I use the freehand tool is for the bunkers, everything else is point-to-point.
- nstone73 likes this


1 user(s) are reading this topic
0 members, 1 guests, 0 anonymous users


