

I await the CF with eager beaver enthusiasm and thank you for the those hints and methods!

CF Private Beta Update
Started by
Kablammo11
, Jan 30 2014 08:09 AM
146 replies to this topic
#121

IanD
-

- Members
-

- 3,371 posts
Advanced Member
#122
Mike Jones
-

- Administrators
-

- 6,159 posts
Advanced Member
Posted 22 February 2014 - 08:44 AM
Think of a jar of preserves sealed with a celophane cover. The Unity terrain is like the preserves, the bulkhead like the glass jar around them, the CF mesh like the celophane cover on top.
What you can do in Unity is to remove the preserves after covering the jar with the cover
For some reason this post makes me want to go and make breakfast. BRB
#123
IanD
-
- Members
-
- 3,371 posts
Advanced Member
Posted 22 February 2014 - 09:12 AM

I shouldn't be posting in a thread I have no right in being within (yet!).. but I like the concept of how you described the preserves.. basically, it's allowing you to operate different heights of terrain either side of a mesh. So in effect, I could easily lose the height behind this wall to something far lower than it currently is. I could then place steps down etc.. incidentally, is that a good way of creating steps..?
- garynorman likes this
#124
Kablammo11
-
- Members
-
- 3,953 posts
Obscure Person
Posted 22 February 2014 - 10:13 AM
Not too sure, Ian. Creating steps is the same as creating your lovely fence with entrance: Importing and placing an object. If you need a vertical drop for a wall, best try to create a mesh object that includes that drop and then remove the Unity terrain that is in the way. That mesh object could be an imported bit of 3D or a CF mesh.
Again: If any additional feature in your design is not meant to play golf upon, it's for you to deal with it in Unity and /or with a 3rd-party app.
I will do my low stone wall bulkheads at Willow Heath round about next Fri/Sat/Sun and will post a step-by-step pictorial about it. Mike, I just have had breakfast before I posted my preserves comment. Great minds think alike… I can go back to the Terrain Soufflé metamophore for the evening hours. (Don't ask, Ian…)
- garynorman and IanD like this
>>>>>>> Ka-Boom!
• Mulligan Municipal • Willow Heath • Pommeroy • Karen • Five Sisters • Xaxnax Borealis • Aroha • Prison Puttˆ
• The Upchuck • The Shogun • Black Swan (•)
<<<<<
#125
LasseThid
-

- Members
-
- 151 posts
Advanced Member
- LocationMölndal, Sweden
Posted 22 February 2014 - 11:48 AM
You mean something like this Ian?

Mobo: Asus Sabertooth P67 CPU: Intel Core i7-2600K CPU Cooler: Corsair Hydro H60 RAM: Corsair Vengeance DDR 3 1600 MHz 8GB GPU: MSI GeForce 970 GTX Gaming 4G Sound: Creative Soundblaster Extreme Gamer SSD: OCZ Agility 3 64GB HDD: 1x 2TB, 1x 1TB, 1x 320 GB Western Digital PSU: Corsair CX 600W Chassi: Thermaltake Aguila
#126
IanD
-
- Members
-
- 3,371 posts
Advanced Member
Posted 22 February 2014 - 04:35 PM
Thankyou K11 for the helpful suggestion and I'd love to see some further explanation regarding your suggestion next weekend. I look forward to seeing how you get on...!
Lassethid... nice work there. What I'm hoping to achieve, is the type of steps where the actual grass texture is used as the step itself, with a small bulkhead holding back each step (I hope that explanation conjures up the image I had in mind).. It's knowing whether to do so using a 3D object or prepare the work K11 indicates is needed. I'm confessing I know very little regarding meshes.. so everything I learn is a hands on approach and understand later..
All good fun though..
#127
Kablammo11
-
- Members
-
- 3,953 posts
Obscure Person
Posted 22 February 2014 - 05:33 PM
What I'm hoping to achieve, is the type of steps where the actual grass texture is used as the step itself, with a small bulkhead holding back each step (I hope that explanation conjures up the image I had in mind).. It's knowing whether to do so using a 3D object or prepare the work K11 indicates is needed.
Definitely create and import a 3D object for that. I'm not saying it's impossible the other way, but it certainly would be a lot more complicated and time-consuming. If you did, you would in fact, be trying to force CF into performing a specialist task that it wasn't meant to do in the first place.
CF is very easy to learn and use, and somewhat limited in its scope: Surfaces you play computer golf on. That's it, that's all - the really big problems you will be facing are coming from a different side: Unity and 3rd party apps, especially those needed for the creation of mesh objects and UV mapping. Remember the Decal divots in the other thread? Same sh*t! Or, in my case, it's creating realistic looking and feeling grass that pleases the eye and the mind when viewed from all distances and all angles and that manages to not look like very old, 2D APCD cutouts barfing pixels while on a bad acid trip - cuz try as I might, that's what my Unity-painted grass tends to do, no matter what.
As you say: All in good fun...
>>>>>>> Ka-Boom!
• Mulligan Municipal • Willow Heath • Pommeroy • Karen • Five Sisters • Xaxnax Borealis • Aroha • Prison Puttˆ
• The Upchuck • The Shogun • Black Swan (•)
<<<<<
#128
IanD
-
- Members
-
- 3,371 posts
Advanced Member
Posted 12 March 2014 - 07:19 AM
Ok... update for those interested. Mike threw me a bone, and added me 2 weeks ago into the Beta program. Whilst no further updates have occurred to the actual CF as yet, I think the guys here are adding people slowly into the programme, which then sees a further addition of creations at a different timescale. I'm nowhere near as proficient as K11 and highdafe, but I have something to aim for...
The fun part of it (for me personally), was the first aid kit Mike provided in the means of instructions using the CF. Whilst I didn't ignore it, I didn't heed it either... lol We are all men here, so do we need instructions..? Open the box as quickly as possibly to get at what's inside... bits of paper are not interesting, so they can sit on the side whilst we play with the thing.. To which I eventually had to resort to reading them, with Mike's words still making me chuckle regarding RTFM. So, that was time to step back and engage in the thinking that "I'm not as good as I thought I was, so lets try baby steps.." approach.
It didn't initially work for me, as like any beta program, the hazards are there, and if forgotten or not understood, you will fall into the same trap until you do understand. Understanding splines are shapes, control points are verts (APCD) and several other things regarding calculating this thing called a mesh, are typically blase once understood. The guys have created a robust piece of kit regarding the CF though, but I think they'd understand if I said it wasn't as user-friendly as they'd like it to be. You don't have to worry though, it's all likely to change and improve.
I'm not sure there is alot more I can say regarding its capabilities that you haven't already seen. There are some neat tricks you can do once you understand the CF simply overlays a mesh onto the Unity terrain created. There are instances where this creates a two-folded issue though, so you sometimes have to walk away and re-think how you'd like to create what it is you're attempting. Also, knowing where to end the CF existence in your course and where to allow Unity to control things, can add food for thought in what you're likely to see too.
The current set of textures, which are likely to change, were quite reasonable. However, this for me, was initially where the world began and I'm still exploring the endless possabilities. Add to this, the 3D world available, and the many assets that Unity will allow you to simply bolt-on.. this is by far one of the most extensive Course creators you're ever likely to see. I can only imagine what the Course Forge will become in a few years time when this thing evolves from the young baby it is, into a full grown woman.
I'll add some images as I begin my journey... suffice to say I have had issues with one design I began and lost. This wasn't the CF's fault, but more in how I wanted to use something provided, and discovering how I should have corrected it before dismantling my course file folders. Backup, backup, backup as they say...
#129
IanD
-
- Members
-
- 3,371 posts
Advanced Member
Posted 12 March 2014 - 12:39 PM
Ok, I said I'd show some images... so, here was what I started with regarding the course I had planned. Do note, everything I've done was always starting with Unity, working on a terrain 1600 x 1400. I can offer my resolution settings for anyone wanting to work in a similar manner. I can't say it's the best method, but it works for me. I'd also add, whilst I'm kind of replicating a course I played when quite young, I'm open to changing everything to how I'd like the course to be vs how I can actually design it using the CF/Unity. So, allowing me a lot of room to call it a fictional course, anyone could start designing with an overlay drawn on a bit of paper, scanned digitally, converted to 32bit TGA format and imported into unity.
It looked like this, my starting image overlay.. however, once I had used the scale on google maps, I had a rough idea it was measuring a plot approx 1400 x 1200, so I simply allowed myself 200m more either direction and made the Unity terrain 1600 x 1400.

I had already been using Unity, so I was familiar with the terrain settings and also the raise/lower terrain and paint options. If you've yet to try.. I'd urge you to learn. You don't even need the CF to do what I've just started explaining.
Once I had the image on my terrain, I set about getting the heights I wanted. Again.. this was a challenge, as I had no idea how high things would elevate. If you add a camera (1st person), you do begin to visually see what you'd expect though. A small bump to something steep is quite noticeable. Something else I found quite handy for reference, was this site :
This site will allow you to locate anywhere you want and give you some much needed info, although you will need to keep referring to it.
So.. it became quite simplistic from that point.. I could see the areas I needed to raise and whilst unsure what I was raising them to, I knew which points were the highest, and others in relation to it. I also knew I was working on a fictional design, so I had licence to use my discretion where needed. And it would be needed..!
It was around this time I'd discovered all the assets in the asset store, trawled the net for textures, 3D objects and learned the many ways of importing things into unity. It gave me good ideas, and also sidetracked me enormously. It was almost an obsession at times, where I couldn't stop saving things I thought would interest me. I've still not got close to discovering what gems I may have, such was the blindness this caused lol... if this phrase helps, stay focused... then do so. Over a dozen projects in my head loomed... without being able to even continue the one I started! I'm glad to say that has passed and I'm returning to one thing at a time..
Anyway, Now I had the CF, I was able to delve into the actual hole design and layout proper. The program caused me a few stumbling blocks early on, and the learning curve wasn't easy to start with. The hours soon passed, and every day i knew a little more. Seeing the many images from K11 and highfade began to show me what was possible, so I wanted to replicate some. Highfades elevated tee, surrounded by bukheads was for me, something like a beacon. I had to have it.. it's taken me 2 weeks to fully grasp how, but I've learned alot during that time, in approach and method. The guys have been excellent in helping, prodding and giving me time to get to this stage in actually coming out as a beta tester. I had nothing to show.. especially when I lost work during a blip importing a package and trying to correct it (badly). I realise this is turning into a long post.. so I'll post this and start a further reply to ensure the content doesn't disappear..
#130
IanD
-
- Members
-
- 3,371 posts
Advanced Member
Posted 12 March 2014 - 01:04 PM
So... the elevated tee highfade had achieved... it set my mind thinking I wanted it. I therefore needed to master it, or at least attempt it. It also meant, in my way of working, if I used it, I perhaps could use it on a lot of holes and make it a theme for the course. Again, this was something (and still is) that is delaying alot of work. However, I'm still happy to learn more of how the CF works with Unity, and if problems occur that can help regarding the beta. With the recent news there is another version of CF coming soon, the testing of the current version is slightly moot, but the suggestions for the next version are still ongoing..
So.. I tried to create a raised area on my first tee and after viewing it with simply sloped sides, I began wrapping a bulkhead around it..

I had also downloaded the wall, as an asset from the asset store, and found a point of reference house to sit on the plot I've flattened for a clubhouse. So, whilst freeloading the bulkheads and wall/railings, I then created the steps embedded in the terrain. These were simply cubes created and combined to allow me to add steps anywhere on the course. I must also say, garynorman donated a plank to this construction for which I'm duly thankful 
As you will see, some areas of the terrain are painted, and some are not (they show the original overlay through). The tee area is actually the Course Forge creation, allowing me to create the spline/shape and manipulate it how I'd like to. I'll pause here... because the Layers Library looms and to a certain extent, this baby is one of those features that hides, shyly at the back. I'm sure K11 would have a name for her.. but for me, she's a dark horse that glides effortlessly and looks stunning. This beauty allows the merging of two textures without need for those alpha's of the past (APCD). Granted, it won't allow the flexability they may have offered, but what it makes up for in being able to create your own layers library goes beyond comprehension. I can't even describe what it is, let alone how it works, but once seen, you must spend a day with her... bring flowers, chocolates, whatever... if you're first date goes well... you're in.
So... how do I get to where I want...? My next image shows a little more regarding the changes I had to make to my existing raised tee area. If I was to wrap it arround using the wooden bulkheads, I had to do so with thought to what I had already placed.

I also made a conscious decision to use the non post side of the bulkhead as the visible side. It may not prove wise, but you have to plump one way or the other..

Ok, I have enveloped the tee area as I wanted. I could have made it smaller, as the area to the right of it is the walkway from off the 9th hole, to the Clubhouse and 10th Tee (up in yonder). However, in terms of creating the final image, I knew how the CF worked and would use the 3D objects of the bulkheads and Fence to hide any seams I didn't want visible. I now had pretty much the shape I wanted... now, I had to call a groundsman to bring some topsoil and fill those gaps..
#131
IanD
-
- Members
-
- 3,371 posts
Advanced Member
Posted 12 March 2014 - 01:14 PM

Those familiar with Unity will now see how it reacts when raising terrain sharply. I simply used the height elevator, once I knew where the top of the bulkhead was. This is where it gets fugly before it gets nice..

So, now I've flattened the area within the bulkhead, I reshaped the tee area, changed the texture slightly, and created 5 separate tee's. I felt the Ladies tee would be better served elsewhere, don't want them as a distraction do we, we want them feeling empowered. I also had a slight elevation change already created, where I'd used my Stairs/Steps onto the Tee Area, so I slightly bended the tee area shape to be more welcoming.

Now, it was a case of removing the earth this side of the bulkhead to give it that groundsman look. The rocky path is poor I know, as I simply threw a texture on there for this. In terms of seeing how easy everything is to change from one thing to another though, is hopefully something that will give us plenty to do.
#132
IanD
-
- Members
-
- 3,371 posts
Advanced Member
Posted 12 March 2014 - 01:23 PM
So.. here's roughly what I managed to achieve.. the 1st tee.


I've even managed to squeeze in the Ladies Tee area, perfectly poised, for them to be their own harem.
It isn't perfect by any means. That last picture seems to show everything tilted, but it's not built that way. Planting will be something that seriously enhances any area of terrain, and those finishing touches regarding changing textures, etc could seriously add to things. I had planned on adding a car park next to the clubhouse, and even have some models I can use. However, like anything, until this piece of kit hits 88mph, we're not gonna see any serious shit...
Thanks for reading this far..!
- Mike Jones, Keith, shimonko and 1 other like this
#133
garynorman
-

- Members
-
- 481 posts
Advanced Member
- LocationBedfordshire, England
Posted 12 March 2014 - 05:59 PM
Good posts, Ian, very informative.
Does CF make the process easier with regards to terrain manipulation (eg your raised tee) or is all down to Unity?
Looks good, by the way
#134
Kablammo11
-
- Members
-
- 3,953 posts
Obscure Person
Posted 12 March 2014 - 06:04 PM
Of course I have her name, Ian. Her name is Libby.
Short for Layers Library: Libby. You may even know her as Libby Langdon. It says so on page 1 of the manual. RTFM.
And gary: No it does not. Terrain manipulation is all Unity.
And if you now wonder how it's possible to manipulate terrain so precisely that it performs a sheer, perpendicular drop along a narrow line of bulkheads? Well, it's impossible. But there's a little trick. Sorry, Ian, did not want to field questions asked to you. Just quickly popped in to say: Libby.
>>>>>>> Ka-Boom!
• Mulligan Municipal • Willow Heath • Pommeroy • Karen • Five Sisters • Xaxnax Borealis • Aroha • Prison Puttˆ
• The Upchuck • The Shogun • Black Swan (•)
<<<<<
#135
garynorman
-
- Members
-
- 481 posts
Advanced Member
- LocationBedfordshire, England
Posted 12 March 2014 - 06:10 PM
Little trick?? Do tell
#136
Kablammo11
-
- Members
-
- 3,953 posts
Obscure Person
Posted 12 March 2014 - 06:22 PM
Want to, but can't. MJ asked me not to. He said they were trying to work out another way of achieving this, so that the current trick might not be required for much longer.
But relax: It's Unity working in tandem with a specific particularity of CF shapes (terrain manipulation is still all Unity), so until you get your CF beta - may this happen soon and I consider this to be overdue - there is nothing you can do atm to recreate this effect on your end.
>>>>>>> Ka-Boom!
• Mulligan Municipal • Willow Heath • Pommeroy • Karen • Five Sisters • Xaxnax Borealis • Aroha • Prison Puttˆ
• The Upchuck • The Shogun • Black Swan (•)
<<<<<
#137
IanD
-
- Members
-
- 3,371 posts
Advanced Member
Posted 12 March 2014 - 06:40 PM
Libby... had to be lol...
She paid me a visit today actually... never saw her personally, she simply turned up when I was on a break, viewed the work I'd done today and dismissed it. I really mean dismissed it too... it's pretty much gone again lol.
Suffice to say the beta world is all about saving what you've done, and that's where I'd li..........
Bugger...
#138
garynorman
-
- Members
-
- 481 posts
Advanced Member
- LocationBedfordshire, England
Posted 12 March 2014 - 07:33 PM
Want to, but can't. MJ asked me not to. He said they were trying to work out another way of achieving this, so that the current trick might not be required for much longer.
But relax: It's Unity working in tandem with a specific particularity of CF shapes (terrain manipulation is still all Unity), so until you get your CF beta - may this happen soon and I consider this to be overdue - there is nothing you can do atm to recreate this effect on your end.
Ah ok, no worries... I will just have to be patient then
#139
IanD
-
- Members
-
- 3,371 posts
Advanced Member
Posted 13 March 2014 - 11:03 AM
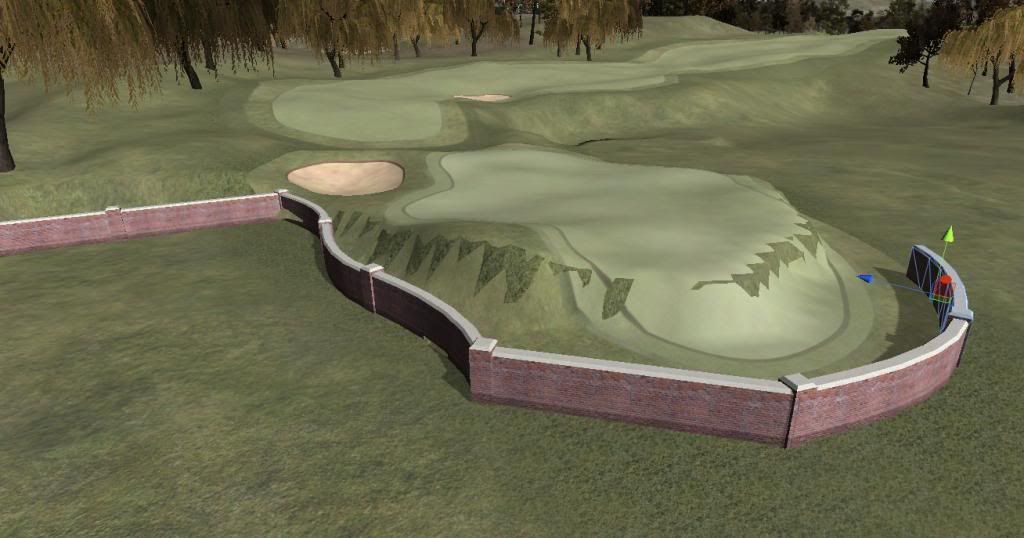
Ok.. todays task.. the 8th green. This typically, like above, will be another bulkhead platform (groans.. another one?). Yay.. when you learn something you like, you tend to go overboard a little. However, on Tee's, they're almost un-noticeable, so subtlety do they place. The above 1st hole is the exception of course, as this is the pinnacle hole where all hopes and inhibitions float across the clubhouse, car park and engulf those looking on. So.. the green. K11 inspired me this time... not the 17th at Sawgrass.. honestly.. K11.

This is it, the basic raw meat and mesh.. I had it dug out, freshly prepared and watered from a nearby source. I even had to close the nearby road, so I could take deliveries of the bulkheads. This was real manual handling, and waders too. We put in one of the bulkheads to gauge the height we wanted..
#140
Kablammo11
-
- Members
-
- 3,953 posts
Obscure Person
Posted 13 March 2014 - 11:27 AM
It's actually a bit easier to first drain the water away. No matter, purely a a question of individual style. Pray go on...
>>>>>>> Ka-Boom!
• Mulligan Municipal • Willow Heath • Pommeroy • Karen • Five Sisters • Xaxnax Borealis • Aroha • Prison Puttˆ
• The Upchuck • The Shogun • Black Swan (•)
<<<<<


1 user(s) are reading this topic
0 members, 1 guests, 0 anonymous users


