Jump to content


Photo

Measurements in Unity


  • Please log in to reply
131 replies to this topic

#1 garynorman

garynorman

    Advanced Member

  • Members
  • PipPipPip
  • 481 posts
  • LocationBedfordshire, England

Posted 18 February 2014 - 09:30 AM

Hi guys,


So after having a little play around in Unity, I have decided to start some groundwork for a course prior to the release of the CF.


My aim is to create a fantasy course from scratch but I am having issues with the measurements inside Unity (ie there are none!!) I can model the terrain, but I have no idea if the 'holes' that I am preparing are huge or tiny...


Can someone please point in the right direction.


Cheers,


Gary


#2 highfade

highfade

    Advanced Member

  • Members
  • PipPipPip
  • 1,749 posts
  • LocationSouth Africa

Posted 18 February 2014 - 09:52 AM

This is one thing I find ridiculous in Unity, they tell you 1 Unit = 1meter but they don't give you a simple tape measure which should be very easy to add.


CF has its own tape measure but it also needs some refinement.


Intel Core i5-6600 CPU 3.3 GHz       Geforce GTX 1060        16GB  RAM       Windows 10 64 bit

Hazyview  (600m above sea level)    --   Nautilus Bay  (Revamp done)  --  Cape Fear  (TGC  adaptation)  --  Aloe Ridge  --  Nahoon Reef GC  --  Chambers Bay 

Abel's Crossing  --  Solitude Links GC


#3 Kablammo11

Kablammo11

    Obscure Person

  • Members
  • PipPipPip
  • 3,953 posts

Posted 18 February 2014 - 09:59 AM

- The base Unity measurement unit is a meter.

- A terrain that is 1600 units large measures 1600 by 1600 meters. 

- Decimals are centimeters: 2.35 means 2 meters and 35 centimeters.

- Unity is an exclusively metric affair. Always meters, not yards.

- The CF has a tape measure that you can set to meters or yards

- And, of course, 1 meter is 1.09361 yards and one yard is 0.9144 meters (or 91.44 centimeters)


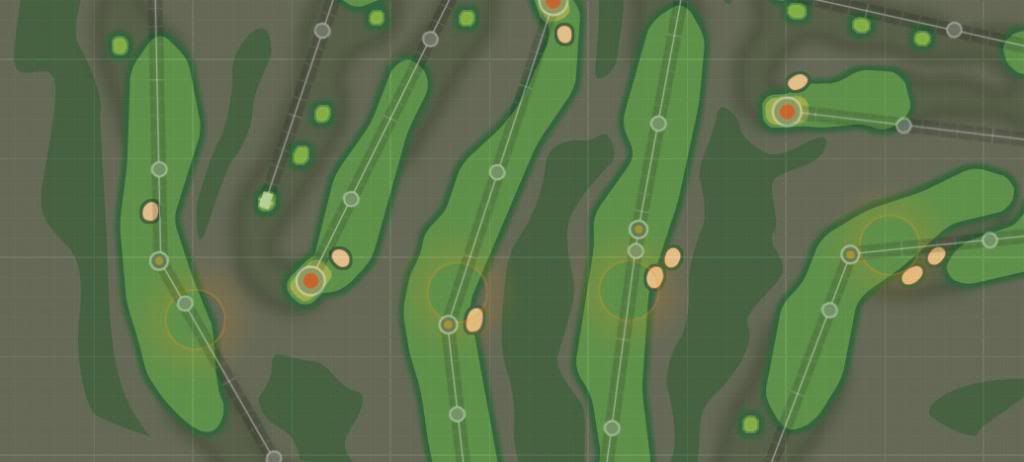
I always start my fantasy course designs (I prefer the word "fictional", sound less like Frodo and Sam stumbling onto my course) with a 2D Photoshop overview. Once I have decided on the dimension of my course there, it's easy enough to determine the distances in yards. I create a Photoshop level with a special 600yd ruler that I use to lay out each of my holes. Sometimes even add a grid to my overviews - in 10 m increments - to later "see" on the terrain what the distances and scales are like.


Layout_zps3843bf9a.jpg


If you don't want to pre-desgin a course, still the best idea would be to create a grid, be in in yards or meters increments, that gives you a basic notion of space and distances. 

If you don't want to prepare your job in Photoshop, you will still nees points of references. There are freeware scripts for distance measurement  in the Asset Store for you, but these are a bit cumbersome and do not give you a visual feedback. If you want to go in there without any helpers, perhaps plant some of your own and use what is already there: Create a few "cube" game objects, for instance, and make them 10 or 20yds in size, then line them up in a chain and move them around to get an idea of distances. 


You're absolutely right to feel concerned about this issue. 


>>>>>>> Ka-Boom!


• Mulligan Municipal • Willow Heath • Pommeroy • Karen • Five Sisters • Xaxnax Borealis • Aroha • Prison Puttˆ

• The Upchuck   The Shogun  • Black Swan (•)


<<<<<


#4 garynorman

garynorman

    Advanced Member

  • Members
  • PipPipPip
  • 481 posts
  • LocationBedfordshire, England

Posted 18 February 2014 - 10:02 AM

Yes, 'fictional' was the word I was reaching for, but it's early in the morning ;)


Excellent idea regarding the grid :)


I will give that a go...


#5 garynorman

garynorman

    Advanced Member

  • Members
  • PipPipPip
  • 481 posts
  • LocationBedfordshire, England

Posted 18 February 2014 - 10:30 AM

Ok so, with the grid idea in mind, what I have done is created a 2000yd x 2000yd grid of 50m high poles placed 50yds apart in a .fbx format... 


#6 shimonko

shimonko

    Advanced Member

  • Members
  • PipPipPip
  • 1,718 posts

Posted 18 February 2014 - 10:39 AM

A simple option is just to use the below texture as the main terrain texture to put a constant grid on the grid. If you tell Unity the texture size is 50x50, then it will put a major gridline every 50 meters and a minor one every 10 meters.


lQ3Gm7G.png
 

Alternatively use this texture as an additional terrain texture and paint it where you wish.


However holes run at angles, not up and down, so I'd typically create a plane in Unity 600m x 50m then pop this texture on telling Unity to repeat it 12 times along the length, once along the width. Then you can rotate the plane accordingly.


Note: when you create a plane, it is 10m x 10m by default. To make it 600mx50m, just enter 60 as the x scale and 5 as the z.


  • garynorman likes this

#7 Kablammo11

Kablammo11

    Obscure Person

  • Members
  • PipPipPip
  • 3,953 posts

Posted 18 February 2014 - 11:32 AM

Smart tip, that… I'd go for that grid texture (perhaps color it differently). It's simple and quick - both qualities which I treasure.

If you don't make it 50 meters but 45.72 meters it will give you 10 yd lines.


>>>>>>> Ka-Boom!


• Mulligan Municipal • Willow Heath • Pommeroy • Karen • Five Sisters • Xaxnax Borealis • Aroha • Prison Puttˆ

• The Upchuck   The Shogun  • Black Swan (•)


<<<<<


#8 garynorman

garynorman

    Advanced Member

  • Members
  • PipPipPip
  • 481 posts
  • LocationBedfordshire, England

Posted 18 February 2014 - 01:38 PM

Many thanks, I'm now using the grid texture to layout a course. :)


#9 Keith

Keith

    Advanced Member

  • Members
  • PipPipPip
  • 411 posts
  • LocationGeorgia, USA

Posted 18 February 2014 - 03:19 PM

Hmmm..this looks to be more complicated than I originally thought.  It seemed to me that with Steve and Brian's course projects here that they simply used the CF measurement tool to lay down routing lines and yardages for each hole then used the forge tools to draw fairway shapes along/around those lines.  I hope plenty of tutorials will be popping up once CF is saturated into the general population.  Looks like I am going to need them.


#10 Kablammo11

Kablammo11

    Obscure Person

  • Members
  • PipPipPip
  • 3,953 posts

Posted 18 February 2014 - 03:58 PM

Don't think you will, Keith, because you basically sussed it out. You can add as many measurement lines as you want into your design and use them like the lines on a real life scorecard and as a helper to draw your shapes, but only… IF YOU HAVE THE CF.

garynorman, meantime, has no CF, hence no ruler tool, and needs to use a work-around. 


>>>>>>> Ka-Boom!


• Mulligan Municipal • Willow Heath • Pommeroy • Karen • Five Sisters • Xaxnax Borealis • Aroha • Prison Puttˆ

• The Upchuck   The Shogun  • Black Swan (•)


<<<<<


#11 Mike Jones

Mike Jones

    Advanced Member

  • Administrators
  • 6,159 posts

Posted 18 February 2014 - 06:15 PM

Yeah Keith the measurement tool in CF is the only one we use and it works fine. It's pretty much a tape measure you can unroll and use anywhere. I'm glad to see other solutions popping up for those people working in Unity who don't have CF yet.


#12 Keith

Keith

    Advanced Member

  • Members
  • PipPipPip
  • 411 posts
  • LocationGeorgia, USA

Posted 19 February 2014 - 02:49 PM

Good to know Mike..thanks!


#13 garynorman

garynorman

    Advanced Member

  • Members
  • PipPipPip
  • 481 posts
  • LocationBedfordshire, England

Posted 19 February 2014 - 04:21 PM

Thanks for the grid idea, its definitely a massive help.  Next question....


I have the heightmap resolution and detail resolution cranked up, but I'm still finding that the brush size struggles with the finer details like bunkers.  What settings do you guys use?


Here's a shot of what I have achieved so far:


Attached Files


#14 Kablammo11

Kablammo11

    Obscure Person

  • Members
  • PipPipPip
  • 3,953 posts

Posted 19 February 2014 - 04:37 PM

2049 pixels is the recommended heihgtmap resolution for the CF 

You could go for 4097, but that would mean that your terrain tools get smaller and you need much more time to shape the terrain - also, it would mean that your course would "gain" 12 mio verts, which is a bit much to process.

For a course of, say, 1400 meters sides, 2049 leaves you with a vertex every 68cms (2 ft 2in). And that's as precise as it gets...


You will, however, find out that once you have CF, you will be able to draw splines (contours of CF meshes) onto the terrain, which are defined by contol points, and which are considrebly more precise to adjust and work with than the, yes, quite blunt terrain brushes. 

Everything pertaining to playing the game of golf: surfaces, shapes etc, is dealt with by the CF - and will be covered by its meshes. So for the time being, working on your terrain (i.e. the 90% of the golf course that actually isn't being played golf on), may be wiser - that's the bit that will not change when CF comes out.


On a related matter, you picture looks yummy!

Mine doesn't, it just illustrates. 


EXPLAINOR_zpsbe7d371c.jpg


>>>>>>> Ka-Boom!


• Mulligan Municipal • Willow Heath • Pommeroy • Karen • Five Sisters • Xaxnax Borealis • Aroha • Prison Puttˆ

• The Upchuck   The Shogun  • Black Swan (•)


<<<<<


#15 garynorman

garynorman

    Advanced Member

  • Members
  • PipPipPip
  • 481 posts
  • LocationBedfordshire, England

Posted 19 February 2014 - 05:49 PM

Thanks for the explanation :)


Roll on getting that level of control!!  What I am planning to do is lay out a course with texture painting then as and when CF is released replace the 'painted' golf related areas with the splines...


#16 Kablammo11

Kablammo11

    Obscure Person

  • Members
  • PipPipPip
  • 3,953 posts

Posted 19 February 2014 - 06:00 PM

Sounds like a plan - and don't worry too much abut precision, the closest you can achieve atm is a decent approximation; the real thing is a lot sharper.


>>>>>>> Ka-Boom!


• Mulligan Municipal • Willow Heath • Pommeroy • Karen • Five Sisters • Xaxnax Borealis • Aroha • Prison Puttˆ

• The Upchuck   The Shogun  • Black Swan (•)


<<<<<


#17 garynorman

garynorman

    Advanced Member

  • Members
  • PipPipPip
  • 481 posts
  • LocationBedfordshire, England

Posted 19 February 2014 - 11:17 PM

Another picture...  It's progressing...  Just need CF now (hint hint!)


Attached Files


#18 shimonko

shimonko

    Advanced Member

  • Members
  • PipPipPip
  • 1,718 posts

Posted 20 February 2014 - 12:37 AM

I haven't got the time to play with CF but I know I won't be able to resist, so take your time guys.

:unsure:


#19 garynorman

garynorman

    Advanced Member

  • Members
  • PipPipPip
  • 481 posts
  • LocationBedfordshire, England

Posted 20 February 2014 - 07:26 PM

...Right, I'm frustrated and so I'm stopping!!!


I'm making decent enough looking terrain, but I cant judge the size with enough confidence...  Plus, as I'm not on the highest detail res I can't accurately contour green complexes or bunker sites (and even if I could I cant judge sizes).


Just spent several hours laying out some holes, then dropped a 3rd person controller on and he looks about 80% of the size I was expecting, meaning that everything is 20% too large!!


#20 highfade

highfade

    Advanced Member

  • Members
  • PipPipPip
  • 1,749 posts
  • LocationSouth Africa

Posted 20 February 2014 - 09:05 PM

I also tend to draw everything too big.


I don't know if it will mess up your yardages but I think you can reduce the whole plot by 20%. Then again it might be a silly idea <_<  I like what you've done so far.


Intel Core i5-6600 CPU 3.3 GHz       Geforce GTX 1060        16GB  RAM       Windows 10 64 bit

Hazyview  (600m above sea level)    --   Nautilus Bay  (Revamp done)  --  Cape Fear  (TGC  adaptation)  --  Aloe Ridge  --  Nahoon Reef GC  --  Chambers Bay 

Abel's Crossing  --  Solitude Links GC


0 user(s) are reading this topic

0 members, 0 guests, 0 anonymous users